![]()
Guided File Processing
Tell me your sorrows.
― Clifford D. Simak, Crying Jag
Introduction
A guided file processing system is like having an experienced ghostwriter by your side—not as a mentor, but as a dedicated assistant. Just as a ghostwriter listens and adapts to your needs, our system enables you to automate processes simply by describing them as a sequence of rules. Share your daily workflow, and Guided File Processing will help you accomplish it efficiently.
While GenAI services are often used as chatbots, agents, or assistants, our approach is different: we treat GenAI as an interpreter for a new kind of programming language—natural human language. In this paradigm, your instructions, written in plain language, become the “source code” that GenAI interprets and executes. This empowers you to intuitively automate and streamline file processing tasks, making even complex workflows accessible to everyone, regardless of technical expertise.
Since we use GenAI prompts as code, it’s important to treat them with the same care as traditional source code. Prompts should be stored within the project in a structured and maintainable way, ensuring they are versioned, reviewed, and easily accessible for future updates or collaboration. This approach helps maintain consistency, traceability, and quality in your GenAI-driven workflows.
These prompts or guidance annotations do not directly impact your application’s runtime behavior. If you prefer, you can bypass the AI stage and use the saved project descriptions as a reference. However, the process becomes much more efficient when you use dedicated tools and focus on testing their output.
To standardize this process, it’s important to use a dedicated marker and a specific location for guidance. Just as different types of code and documents have their own comment blocks, you can utilize these blocks to include your guidance tag, ensuring clarity and consistency throughout the project.
In this paradigm, AI is not the central focus but rather a supportive, behind-the-scenes service—much like a ghostwriter—that helps you work more efficiently and effectively.
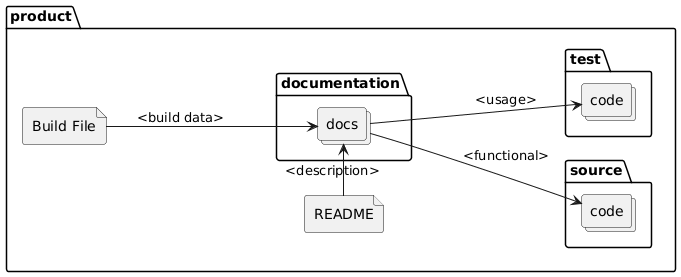
Guided file processing leverages the AI Ghostwriter’s intelligent file process guidance engine to automate, standardize, and enhance project documentation and code annotation across multi-module projects. By embedding actionable @guidance annotations, it ensures consistency, clarity, and maintainability throughout your codebase and documentation assets.
The workflow establishes a content pipeline in which @guidance annotations embedded in source and test code, as well as project files, are used to extract, organize, and present information. The @guidance tag can be leveraged to gather details for build configuration and project documentation, ensuring consistency, accuracy, and automation across all generated project materials.
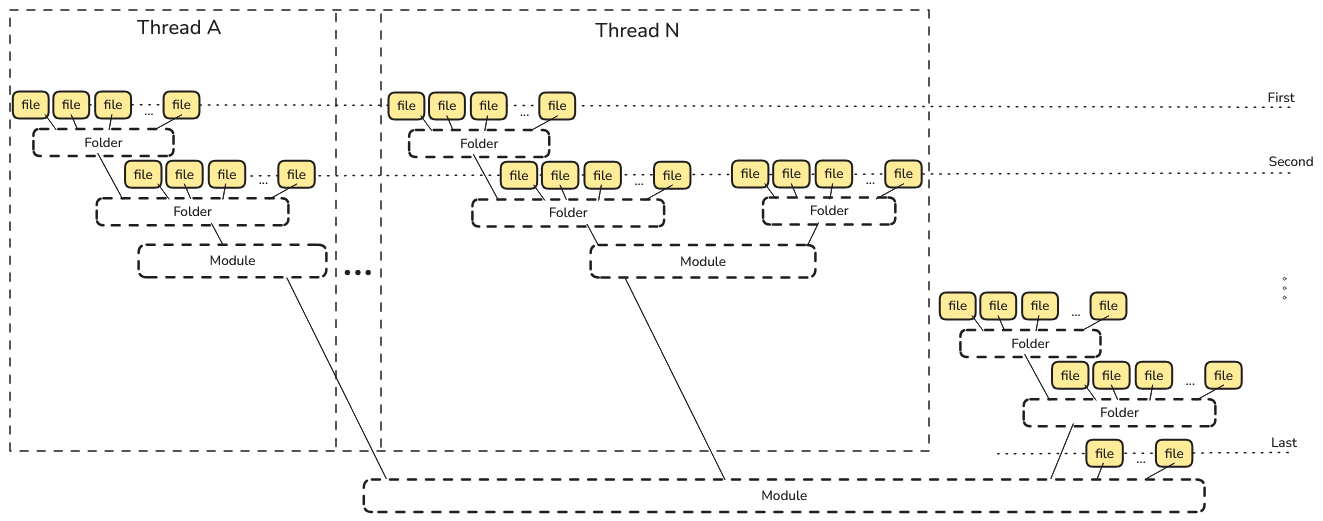
The image illustrates a multi-threaded file processing workflow where sub-modules are processed first in parallel across multiple threads. Within each thread, all files in sub-modules and their folders are handled before the parent module’s files are processed. This ensures that processing starts from the deepest level and moves upward, maintaining correct dependency order and maximizing parallel efficiency:
Guidance Annotations
Guided file processing does not perform any actions on its own, every step is initiated by user guidance tags. The system only acts in response to explicit instructions, ensuring that users remain in full control of the process.
The workflow example below is provided for illustration purposes only and does not need to match your specific use case. You are free to define any rules or processes for file processing that best suit your needs.
Guided file processing operates across multiple layers of your project:
The system uses @guidance annotations and dedicated guidance files to automate the extraction, organization, and generation of project documentation and configuration files. Here’s how the workflow operates:
-
Embedding Guidance
- Developers add
@guidanceannotations directly into source code, test code, and documentation files. These annotations specify what information should be extracted or highlighted for documentation and automation purposes. - Special
@guidance.txtfiles can be placed at the project, source, or test folder level to provide structured instructions for GenAI tools.
- Developers add
-
Information Extraction
- The documentation system scans the project structure, collecting functional information from source code and usage information from test code, both guided by the embedded
@guidanceannotations. - Documentation files in the
documentationfolder aggregate this information, organizing it for easy reference and further processing.
- The documentation system scans the project structure, collecting functional information from source code and usage information from test code, both guided by the embedded
-
Content Generation and Integration
- The build configuration file (e.g.,
pom.xml,build.gradle) pulls summary information from the generated documentation, ensuring that project metadata is always up to date. - The
README.mdfile is generated or updated using descriptive content from the documentation, such as project overviews, module descriptions, and usage instructions—all derived from the most authoritative and current sources in the codebase. - Guidance files in the test and source folders can direct the generation of new tests or documentation, ensuring comprehensive coverage and consistency.
- The build configuration file (e.g.,
-
Automation and Consistency
- By centralizing guidance in annotations and dedicated files, the system automates much of the documentation and configuration process.
- This approach ensures that all generated materials—documentation, build files, and README—are consistent, accurate, and reflect the latest state of the project.
-
Review and Iteration
- After automated processing, developers review the generated outputs. If needed, they refine the
@guidanceannotations or guidance files and rerun the tool to improve the results. - Once satisfied, the updated files are committed to the repository, maintaining a clear and traceable history of both code and documentation changes.
- After automated processing, developers review the generated outputs. If needed, they refine the
This workflow streamlines project maintenance, reduces manual effort, and ensures that documentation and configuration always stay in sync with the codebase.
The Root Directory
In Machai Ghostwriter, the root directory (rootDir) is a foundational concept that determines the starting point for all project analysis, scanning, and documentation generation. Understanding and configuring the root directory correctly is essential for effective use of Ghostwriter, especially in complex or multi-layered project environments.
What Is the Root Directory?
- The root directory is the base folder from which Ghostwriter begins analyzing your project’s structure.
- It can represent:
- The root of a single project (e.g., a Maven or Gradle project root).
- A folder containing multiple projects or modules (e.g., a monorepo or a parent directory for several subprojects).
- Ghostwriter supports a variety of project types and recognizes different project layers, making the root directory flexible for diverse setups.
How Ghostwriter Uses the Root Directory
- Folder Structure Analysis:
Ghostwriter scans the root directory to discover source code, documentation, configuration files, and submodules.
It builds a hierarchical view of your project, enabling features like multi-module processing, child-first scanning, and project-wide documentation. - Project Type Detection:
The root directory is used to detect the type of project (Maven, Gradle, Node.js, etc.) and to locate relevant build files and metadata. - Scope Control:
By setting the root directory, you control the scope of Ghostwriter’s analysis—whether it’s a single project, a group of projects, or a specific subfolder.
How to Define the Root Directory
You can specify the root directory in several ways:
- In
gw.propertiesfile:
Set therootDirproperty to the desired path.rootDir=/path/to/your/project - As an environment variable:
export GW_ROOTDIR=/path/to/your/project - As a Java system property:
-DrootDir=/path/to/your/project - Default behavior:
IfrootDiris not defined in any of the above ways, Ghostwriter will use the current working directory as the root.
Best Practices
- For single-project repositories, set the root directory to the project root.
- For monorepos or multi-project folders, set the root directory to the parent folder containing all projects.
- Always ensure the root directory is accessible and contains all files and subfolders you want Ghostwriter to process.
The Scanning Directory
In Machai Ghostwriter, the scanning directory (scanDir) determines the specific folder where file scanning and analysis begin. This setting allows you to focus Ghostwriter’s processing on a particular part of your project, providing flexibility and control over which files and subdirectories are included in the documentation and review workflow.
What Is the Scanning Directory?

- The scanning directory is the entry point for Ghostwriter’s file scanning process.
- Only files and subfolders within the scanning directory are considered for analysis; all other folders outside this path are ignored.
- The scanning directory must be located within the defined
rootDir.
How Ghostwriter Uses the Scanning Directory
- Targeted Analysis:
By specifying a scanning directory, you can limit Ghostwriter’s processing to a specific module, source folder, or documentation area, rather than the entire project. - Efficient Workflows:
This is especially useful for large projects, monorepos, or when you want to process only a subset of files (e.g., just thesrc/main/javadirectory). - Folder Structure Understanding:
Ghostwriter builds its internal representation of the project structure starting from the scanning directory, enabling accurate documentation and code review for the selected scope.
How to Define the Scanning Directory
You can specify the scanning directory in the following ways:
- Command Line Parameter:
Use the-Dgw.scanDiroption when running the plugin or CLI:sh mvn org.machanism.machai:gw-maven-plugin:0.0.11:gw -Dgw.scanDir=src/main/java - Default Behavior:
- If
scanDiris not specified butrootDiris defined, Ghostwriter uses the current directory as the scanning directory. - If neither is specified, the current working directory is used for both root and scanning directory.
Requirements and Best Practices
- The scanning directory must be located inside the root directory (
rootDir).
If you specify ascanDiroutside ofrootDir, Ghostwriter will raise an error. - Use
scanDirto: - Focus processing on a specific module or folder.
- Speed up analysis by excluding unrelated files and directories.
- Run targeted documentation or review tasks as part of your automation pipeline.
- For full-project processing, you can omit
scanDirand let Ghostwriter scan the entirerootDir.
Default Guidance
The defaultGuidance parameter provides a universal fallback instruction for the processing workflow, ensuring that all files and folders within the scan scope receive meaningful and consistent guidance—even when explicit, file-level directives are absent.
Scope and Application
- The
@guidancetag is designed to be embedded directly within individual files, offering file-specific instructions that take precedence during processing. - In contrast,
defaultGuidancecan be applied at both the file and folder (directory) level. This means that if a folder or any file within it lacks an explicit@guidancedirective, thedefaultGuidancecontent will be used to guide processing for all items within that scope. -
This dual-level applicability ensures that entire directories, as well as individual files, are never left without direction, supporting comprehensive and uniform documentation or review.
-
When a file contains an embedded
@guidancedirective, that directive is used exclusively for processing that file. - If no such directive is present, the processor applies the
defaultGuidancevalue to the file or folder. - This fallback mechanism guarantees that all elements within the scan scope are processed according to at least a baseline set of instructions.
Folder-Level Guidance
The @guidance.txt File
The @guidance.txt file is designed to be processed by GenAI tools. It contains explicit, actionable instructions that must be followed for the corresponding folder. When working with a folder containing an @guidance.txt file.
Example:
File: /bindex-core/src/test/java/org/machanism/machai/bindex/@guidance.txt
Create high-quality unit tests in this folder for all public and package-private classes and methods
in the package `org.machanism.machai.bindex`.
The source files are located at `[Project Path]/src/main/java/org/machanism/machai/bindex`.

Guidelines:
- Ensure comprehensive coverage of all core logic, edge cases, and error handling.
- Use descriptive test method names and meaningful assertions.
- Follow the Arrange-Act-Assert (AAA) structure in each test.
- Mock dependencies where appropriate to isolate the units under test.
- Place test files in this directory, mirroring the package structure of the source files.
- **Use the Java version specified in the project's `pom.xml` for all test code and configuration.**
Note:
The presence of an @guidance.txt file at the folder level indicates mandatory requirements for GenAI processing in the corresponding package.
Java Package Guidance
For Java package can be use a package level folder @guidance tag in the package-info.java file.
Example:
File: /bindex-core/src/main/java/org/machanism/machai/bindex/package-info.java
package org.machanism.machai.bindex;
/*-
* @guidance:
*
* **IMPORTANT: ADD JAVADOC TO ALL CLASSES IN THE PACKAGE AND THIS `package-info.java`!**
*
* - Use Clear and Concise Descriptions:
* - Write meaningful summaries that explain the purpose, behavior, and usage of each element.
* - Avoid vague statements; be specific about functionality and intent.
*
* - Update `package-info.java`:
* - Analyze the source code within this package.
* - Generate comprehensive package-level Javadoc that clearly describes the package’s overall purpose and usage.
* - Do not include a "Guidance and Best Practices" section in the `package-info.java` file.
* - Ensure the package-level Javadoc is placed immediately before the `package` declaration.
*
* - Include Usage Examples Where Helpful:
* - Provide code snippets or examples in Javadoc comments for complex classes or methods.
*
* - Maintain Consistency and Formatting:
* - Follow a consistent style and structure for all Javadoc comments.
* - Use proper Markdown or HTML formatting for readability.
*
* - Add Javadoc:
* - Review the Java class source code and include comprehensive Javadoc comments for all classes,
* methods, and fields, adhering to established best practices.
* - Ensure that each Javadoc comment provides clear explanations of the purpose, parameters, return values,
* and any exceptions thrown.
*
* - Escape `<` and `>` as `<` and `>` in `<pre>` content for Javadoc.
*/
File-Level Guidance
Markdown, HTML and XML Files
Example:
File: /anteater/README.md
<!--
@guidance:
**ADD FOLLOWING SECTIONS TO THIS README FILE:**
1. **Project Title and Overview:**
- Provide the project name and a brief description based on `src\site\markdown\index.md` content summary.
- Add `` before the title.
- Add `[](https://central.sonatype.com/artifact/[groupId]/[artifactId])` after the title as a new paragraph. [groupId] and [artifactId] need to use from pom.xml.
2. **Module List:**
- List all modules in the project.
- For each module, include its name, a short description, and a link to its module.
3. **Installation Instructions:**
- The project uses SVN repository.
- Describe how to checkout the repository and build the project using Maven.
- SVN URL: `https://svn.code.sf.net/p/anteater/code/trunk`
- Include prerequisites such as Java version and build tools.
4. **Usage:**
- Explain how to run or use the project and its modules.
- Provide example commands or code snippets if applicable.
5. **Contributing:**
- Outline guidelines for contributing to the project, including code style, pull request process, and issue reporting.
6. **License:**
- State the project’s license and provide a link to the license file.
7. **Contact and Support:**
- Include contact information or links for support and further questions.
8. **Other Rules**
- Do not use the horizontal rule separator between sections.
**Formatting Requirements:**
- Use Markdown syntax for headings, lists, code blocks, and links.
- Ensure clarity and conciseness in each section.
-->
Use this annotation to remind contributors to provide meaningful overviews and maintain up-to-date references to related modules or subprojects.
Java and TypeScript Files
For Java and TypeScript source files, use the @guidance annotation within a multiline comment block (not in Javadoc or TSDoc comments).
Example:
File: /machai/gw-maven-plugin/src/main/java/org/machanism/machai/maven/Process.java
/* @guidance: Generate javadoc with a description all maven plugin parameters and examples of usage. */
TypeScript example:
/*
 * @guidance:
 * - Document all exported classes, interfaces, functions, and constants using TSDoc.
 * - Provide clear descriptions, parameter details, and usage examples.
 * - Keep documentation up to date with code changes.
 * - Do not use `@guidance` within TSDoc comments.
 */
Python Files
For Python files, use a multi-line comment at the top or in the relevant section to include guidance:
'''
@guidance:
- Follow PEP 257 for docstrings.
- Document all public classes, methods, and functions.
- Keep comments up to date and clear.
'''
...
This approach ensures that guidance is easily accessible and can be processed automatically for documentation and code quality purposes.